Anyone can write a check for rent. But you don’t want to make any mistakes, or else you could end up behind on your rent. Fortunately, we’ll walk you through each step so you can be sure you aren’t missing anything.
Example Rent Check
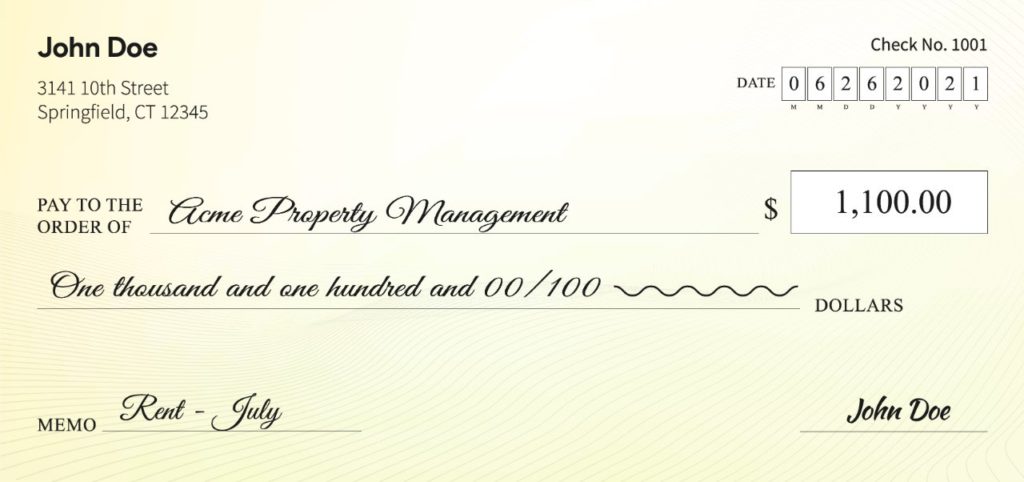
You can see here an example rent check:

How to Write a Rent Check
When writing a check, you typically need to fill in six items:
- Date
- Pay to the Order Of
- Dollar amount box
- Check amount line (written using words)
- Memo line
- Signature line
Let’s walk through each of these items in turn.
Fill in the Date
The date blank is on the upper right-hand portion of the check. You can use any typical format, including:
- Month/Day/Year (such as 10/22/2021 or 10/22/21)
- Month Day, Year (such as October 22, 2021, or Oct. 22, 2021)
The important part is to include the month, day, and year. All three of those need to be in place or the check isn’t filled out correctly.
Print the Name of the Payee
In the “Pay to the order of” line, you’ll print the payee’s name. This may be your landlord’s name or a rental company name, depending on who you’re renting through and how they want it listed.
In our example, the tenant is renting a property through Acme Property Management. As a result, they would print “Acme Property Management” in the “Pay to the order of” field.
You’ll want to make certain you fill your rent out to the right entity. In some cases, you’ll write in the landlord’s name. In others, you may need to use a rental management company name.
Often, landlords include that information in the lease. However, if you are unable to find it there, you should contact your landlord to confirm who the payee is, ensuring you write in the correct information.
Write Your Rent Amount in Numbers
Just to the right of the “Pay to the order of” field is a blank spot with a dollar sign printed next to it. Here, you write out your rent amount using numbers.
For example, if your rent is $1100.00, you’d write “1100.00” in that blank. Since the dollar sign is printed on the check, you don’t need to include that; just the numbers are fine.
However, you do need to make sure you include both dollars and cents, even if your rent is a flat dollar amount. With checks, specificity is important, so include the “.00” when you fill yours out.
Write Your Rent Amount in Words
Just below the “Pay to the order of” field, you’ll see a blank line with the word “Dollars” printed on the right-hand side. Here, you need to write out your rent amount mainly using words.
The only exception is when it comes to cents. With that, you write the cents as a fraction, with the bottom number being 100 (such as “##/100”). The 100 notes how many cents are in a dollar, while the top number is the number of cents in the amount you’re paying.
For example, if you were writing a check for $350.46, you write the cents as 46/100.
When there aren’t any cents, you do use a different approach. Instead of writing “00/100,” you use “no/100” in its place. That’s because “00/100” could easily be edited by someone else to read another amount, like “100/100” by putting a “1” in front. With the “no/100” approach, that can’t happen.
So, if you’re rent amount is $1,100, like our example, you would need to write “One thousand one hundred and no/100” in that line.
Add a Memo
The memo line – which is on the lower left-hand side and is usually labeled with “memo” or “for” – is a spot where you can write a quick note regarding the reason for the check. Technically, it doesn’t have to be filled out for a check to be accepted by a bank or landlord. However, using it is a smart move.
A good option for the memo line rent check is to write in which month’s rent you’re paying. For example, if you were handling your January payment, you could write “Rent – January,” like our example.
In some cases, you could also add a detail about your rental apartment or home. For instance, if the landlord runs one apartment building, also include your apartment number. If you lived in 2B, you would write “Rent – Apt 2B – January.”
The latter approach is a good move if your personal information in the upper left-hand corner doesn’t have the rental’s address. It ensures the landlord knows what rent you’re paying right away, which works in your favor.
Sign the Front of the Check
To the right of the memo line, you’ll see a blank. That’s where your signature goes when you’re writing a check.
Without a signature, your check can’t be cashed or deposited. As a result, this is the most crucial step. However, it’s also one you should do until you’re ready to send the check on its way, as pre-signed checks put you at risk for fraud or theft.
Once your signature is in place, you’ve successfully written your rent check. Now all you need to do is get it to your landlord on time, and you’re done.
Flex: A Better Way to Pay the Rent
Instead of writing a check for rent, you could also try Flex. By splitting your monthly rent into two payments, Flex frees you up from having to pay your rent all at once on the first of the month. Click here to check it out.


